Layer Labels & Map Legend
Descriptive information of the data presented in a map is o vital importance for a user to interpret the content of a map. Explaining the chosen representation for the data in the image is certainly key for this interpretation. In this section of the exercise, we will see how to make it possible for a WMS to include labels for a layer, and to obtain produce a legend that describes the presentation styles. Let's start by adding the necessary configuration to the '.map' file to produce airport labels.
Modify the existing CLASS definition of the airports LAYER to include an example set of LABEL configuration parameters as shown in 1.
|
61 62 63 64 65 66 67 68 69 70 71 72 73 74 75 76 77 78 79 80 81 82 83 84 85 86 87 88 89 90 91 92 93 94 95 96 97 98 |
dotdotdot PROJECTION "init=epsg:4326" END CLASSGROUP "circle" #default style name LABELITEM "airport_name" #attribute to use for labels CLASS NAME "Airports" GROUP "circle" #circle style name STYLE SYMBOL "circle_sym" SIZE 10 COLOR 0 0 0 END #style END #class CLASS NAME "Airports" GROUP "airplane" #airplane style name STYLE SYMBOL "airplane_sym" SIZE 15 COLOR 93 25 14 END #style LABEL COLOR 0 0 0 TYPE TRUETYPE FONT "arial" MINSIZE 5 MAXSIZE 8 POSITION AUTO PARTIALS FALSE BUFFER 2 END #label END #class END #layer airports dotdotdot |
With LABELITEM parameter you define which attribute/column in the source data should be used to obtain the text for the labels. In the CLASS object you insert one (or more) LABEL objects to define how the text labels should be rendered.
| COLOR | The RGB value to use to draw the text with. |
| TYPE | The type of font to use. |
| FONT | The font type to use for the labels. The value should match an alias from the FONTSET. In this cases the value comes from the names in the 'fonts.list' file.. |
| MINSIZE & MAXSIZE | Specify which minimum and maximum font size to use when scaling the text of the labels. |
| POSITION | Defines the position of the label text in relation to a feature. The value is a combination of vertical and horizontal positions. You have the following choices: for vertical alignment, C for centre, U for upper, and L for lower; and for horizontal alignment, C for centre, L for left, and R for right. So, to align the label to the centre you would use the value CC (centre--centre). Or if you would like to place the label on the lower left, you would use LL. Another option is to let MapServer decide the best position for your labels. For this you use the value AUTO. |
| STYLES | Comma-separated list of one rendering styles per requested layer. If the styles parameter is empty, MapServer will use the default styles as specified in the MAP file. |
Submit a new request for the airports layer to see the image now including the names of the airports.
Now, proceed to modify the '.map' file to add the configuration parameters to produce a legend as shown in 2.
|
47 48 49 50 51 52 53 54 55 56 57 58 59 60 61 62 63 64 65 66 67 |
dotdotdot END #circle symbol LEGEND KEYSIZE 16 12 LABEL COLOR 0 0 0 TYPE TRUETYPE FONT "arial" SIZE 10 END #label STATUS EMBED POSITION LR END #legend LAYER NAME airports TYPE POINT dotdotdot |
| KEYSIZE | Sets the size (in pixels) of the symbols in the legend keys. |
| LABEL | Sets the type, size, color and font for the labels of the legend keys (Just like feature labels). |
| FONT | The font type to use for the labels. The value should match an alias from the FONTSET. In this cases the value comes from the names in the 'fonts.list' file.. |
| STATUS | Specifies if the legend is delivered as a sperate image ON, or as part of the map image EMBED. |
| POSITION | Sets the position of the legend within the map image when it is embedded. |
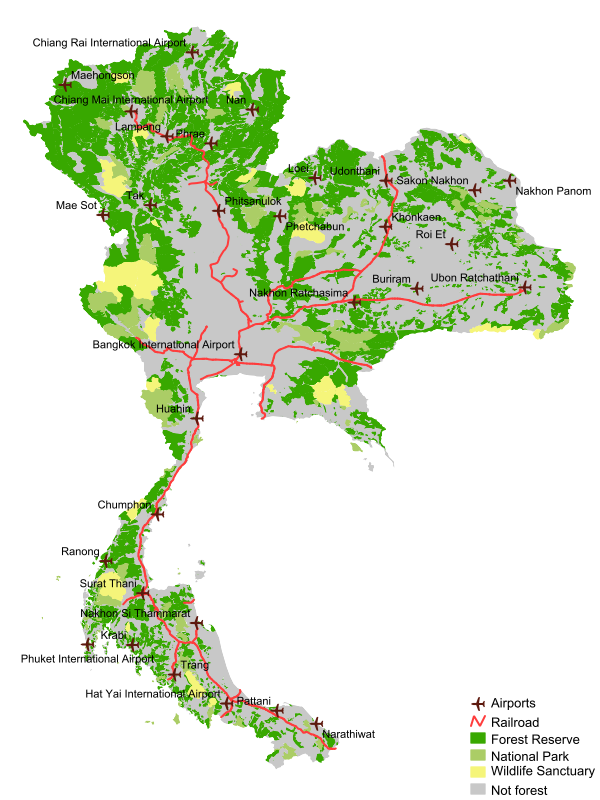
Submit a new request to get all the layers and see the final result. Since we have embedded the legend, then it automatically shows as part of the map image. You should get an image like the one shown in 1.