Scripts & Triggers
Thus far we have created only structural elements of the process. That is, tasks, variables, forms etc. We now need to incorporate functions to use the input of the forms and, for example, validate user input, generate resulting process data, evaluate conditions, etc. To start with, we will connect the database that contains cadastral data to the process, this way we will be able to write queries against the database and extract required information.
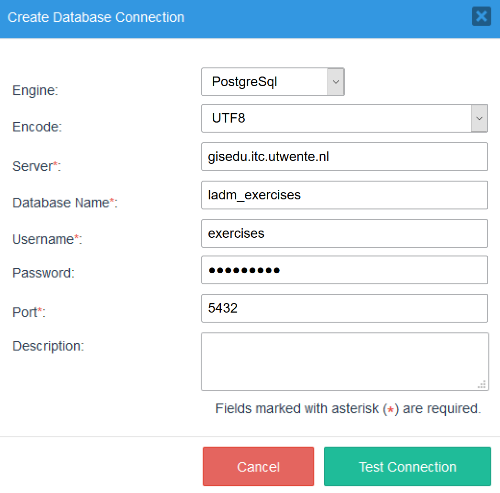
- To create a database connection, click on the Database Connections button on right-hand side menu and select Create. Fill in the form to make the connection using the exercise user credentials (exercises/exercises) for the Postgres/PostGIS database server located on gisedu.itc.utwente.nl, see Figure 3-1. With the fields completed, click on Test Connection and if successful then hit Save.
DataRequest Form Script
The description of the SDS process states that the client should draw on the map the enclosing area containing the parcel that he/she is interested in. To that end we need to provide a base map to be used as a reference. We also need to enable drawing functionality on the map. And finally we need to capture the coordinates of the drawn area and store them in the appropriate field.
All these tasks take place while the DataRequest form is visible in the browser. The scripting language that the browser use for just such a task is JavaScript. ProcessMaker provides functionality to add custom scripts to a form, and also to include third-party JavaScript libraries. We will use this capability to complete the functionality of the DataRequest form. We will use a JavaScript mapping library called OpenLayers, and a custom script.
- Open the
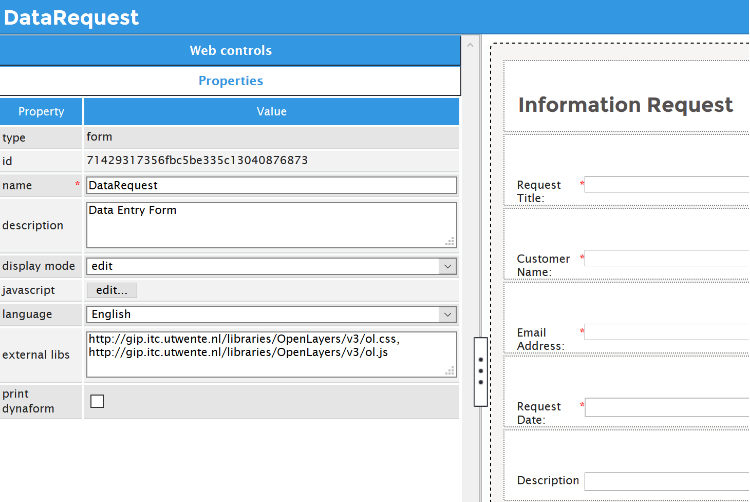
DataRequestform for editing and select the main form (right-click outside fields or web controls, a dashed line should appear around the form), then click on the Properties button on the left-hand side. This action will open the properties of the form (See Figure 3-2)- To add the OpenLayers library files to the form, add the links shown in Listing 3-1 to the external libs property of the form:
|
1 2 |
http://gip.itc.utwente.nl/libraries/OpenLayers/v5/ol.css, http://gip.itc.utwente.nl/libraries/OpenLayers/v5/ol.js |
- To add the custom script to the form, click on the edit... button of the javascript property of the form, paste the content of Listing 3-2 in the JavaScript editor, and then click Save
- Save the form to store the changes.
|
1 2 3 4 5 6 7 8 9 10 11 12 13 14 15 16 17 18 19 20 21 22 23 24 25 26 27 28 29 30 31 32 33 34 35 36 37 38 39 40 41 42 |
$("#requestDate").setValue(new Date().toJSON().slice(0,10)); var aoiSource = new ol.source.Vector(); var aoi = new ol.layer.Vector({ source: aoiSource, style: new ol.style.Style({ fill: new ol.style.Fill({ color: 'rgba(255, 255, 255, 0.6)' }), stroke: new ol.style.Stroke({ color: '#DC143C', width: 2 }) }) }); aoiSource.on('addfeature', function(){ var coords = $.extend(true, {}, aoiSource.getFeatures()[0].getGeometry()); coords = coords.transform('EPSG:3857','EPSG:4326'); $("#aoiCoordinates").setValue(JSON.stringify(coords.getCoordinates()[0])); }); var osmLayer = new ol.layer.Tile({ source: new ol.source.OSM() }); var requestMap = new ol.Map({ layers: [osmLayer,aoi], target: 'mapContainer', view: new ol.View({ extent: ol.proj.transformExtent([6.8658, 52.2109, 6.9182, 52.2270], 'EPSG:4326', 'EPSG:3857'), center: ol.proj.transform([6.892, 52.219], 'EPSG:4326', 'EPSG:3857'), zoom: 15, minZoom: 14, maxZoom: 19 }) }); var draw = new ol.interaction.Draw({ source: aoiSource, type: 'Polygon', }); draw.on('drawstart', function(){ aoiSource.clear(); }); requestMap.addInteraction(draw); |
Scripting and the use of mapping libraries has already been discussed in other courses. So here we simply describe the functions of this particular script. In line 1 we set the default value of the requestDate field to today. In lines 3–15 we define an object to store the polygon drawn by the user on the map. In lines 17–21 we update the value of the aoiCoordinates field with coordinates when the user finishes drawing a polygon. In lines 23–25 we create an object to hold the basemap, in this particular case we are using OpenStreetMap as the source of the basemap. In lines 27–35 we create a map object on the mapContainer of the form. Finally in lines 37–42 we activate interactive drawing on the map.
Preview the updated form to see the result of the inclusion of these scripts. Try drawing a small polygon on the map to see the effect on the form. For the purpose of the process we expect the user to draw a polygon just around the parcel that he/she is interested in. Double-click on the last position or click on the first position to close the polygon. This polygon of the area-of-interest can be redrawn as many times as required. If the polygon drawn by the user is to big and contains more than one parcel, only one of those parcels will be selected for processing (an arbitrary one). If we wanted to prevent this behaviour a much more elaborated script will be needed. Once you are done, close the DataRequest form and return to the process diagram.
ReviewRequest Form Trigger
Triggers are small scripts written in PHP which are configured to execute at very specific moments along the execution of a workflow. For example a trigger can be called just after a task is finished or before a gateway condition is evaluated, etc. In our case we will create a trigger to be execute just before the ReviewRequest form is shown to the user. We will use the trigger to retrieve data from the database about the parcel inside the area of interest chosen by clients. This data includes the identification of the parcel as well as its ownership status. This data will be use to populate the fields of the ReviewRequest form so that the employee responsible for approval or rejection of the request has all the details needed to make the decision.
- To create a trigger, click on the Triggers button on right-hand side menu and select Create. Specify a name of the trigger as
RetrieveParcelInformationand provide a short description.- Next, Click on Open Editor to add the code of the trigger. Paste the code that appears in Listing 3-3 in the trigger editor, then click Apply followed by Save.
|
1 2 3 4 5 6 7 8 9 10 11 12 13 14 15 16 17 18 19 20 21 22 23 24 25 26 27 28 29 30 31 32 33 34 35 36 37 38 39 40 41 42 43 44 45 46 47 48 49 50 51 |
/* database identifier */ $pg = '47586470856fe830965fe59023988130'; /* generate geometry from aoi coordinates */ $aoi = @@aoiCoordinates; $aoi = '{"type":"LineString","coordinates":' . $aoi . '}'; $aoiGeom = "ST_Transform(ST_Polygon(ST_GeomFromGeoJSON('$aoi'),4326),28992)"; /* identify target spatialunit and retrieve attribute details */ $query = "SELECT spatialunit_id AS objectid, st_astext(geom) AS objectgeom, " . "ST_AsGeoJSON(ST_Transform(ST_Centroid(geom),4326)) AS objectcentroid, " . "box2d(ST_Expand(geom,50)) AS bbox, ST_Area(geom) AS area " . "FROM enschede.spatialunit " . "WHERE ST_Contains($aoiGeom,geom) " . "ORDER BY area DESC LIMIT 1;"; $result = executeQuery($query,$pg); /* if there is a result, assigns query values to process variables */ if (is_array($result) and count($result) > 0) { $objectid = $result[1]['objectid']; @@cadastralNumber = $objectid; @@objectGeometry = $result[1]['objectgeom']; @@objectCentroid = $result[1]['objectcentroid']; @@objectBbox = $result[1]['bbox']; /* identify neighbouring spatialunits */ $query = "SELECT n.bu_naam AS neigh " . "FROM netherlands.neighbourhood AS n, enschede.spatialunit AS s " . "WHERE s.spatialunit_id = '$objectid' " . "AND ST_Intersects(n.geom,s.geom);"; $result = executeQuery($query,$pg); @@neighbourhood = $result[1]['neigh']; /* determine ownership */ $query = "SELECT np.firstname || ' ' || np.lastname AS owner_name " . "FROM enschede.spatialunit AS s, enschede.right AS r, enschede.natural_person AS np " . "WHERE s.spatialunit_id = '$objectid' " . "AND s.spatialunit_id = r. spatialunit_id AND r.party_id = np.np_id;"; $result = executeQuery($query,$pg); @@naturalPerson = $result[1]['owner_name']; $query = "SELECT nnp.nnp_name " . "FROM enschede.spatialunit AS s, enschede.right AS r, enschede.non_natural_person AS nnp " . "WHERE s. spatialunit_id = '$objectid' AND s.spatialunit_id = r. spatialunit_id " . "AND r.party_id = nnp.nnp_id;"; $result = executeQuery($query,$pg); @@nonNaturalPerson = $result[1]['nnp_name']; } else { @@cadastralNumber = 'No spatial unit found inside the given Area Of Interest'; @@objectGeometry = 'POLYGON()'; } |
- To associate the trigger with the process, right-click on the
Process Requesttask and select Steps. Now add theRetrieveParcelInformationtrigger to the Before Dynaform step of the task.
The RetrieveParcelInformation trigger is used to populate the fields of the ReviewRequest form, with values retrieved from the database. Process variables can be accessed from the trigger using the following format: @@ followed by the variable name. For example, to access the identifier of a cadastral object we will use @@cadastralNumber.
in line 2 we specify the UID of the database connection to be used in this trigger. You should use your own number here. You can find it by clicking on the Show ID button next to the database connection. In line 5–7 we assemble a text string with the geometry properties of the area of interest, which then we use in lines 10–16 to identify the largest spatial unit contained within the given area of interest. Study the query to understand what is happening. If there is a positive result then, in lines 20–47, we populate the various fields in the form with response values from the queries. A few more queries are sent to the database to obtain ownership information, lines 35–47; and also the neighbourhood where the object of interest is, lines 27–32. If no spatial unit is found, then we simply report that fact back to the user by filling a couple of form fields with the corresponding details, lines 49–50. Once the execution of the trigger finishes, the form with the newly updated information is shown to the user.
ReviewRequest Form Script
The ReviewRequest form now contains the information needed to do a proper evaluation of the request. The service office can see the parcel identifier, the ownership details, etc. To enhance the form however we can also display graphically some of the details of the identified object, for example, its geometry, the neighbouring objects, and so on. To that end we will add a script to the form.
- Open the
ReviewRequestform for editing with the main form container selected, click on the Properties button on the left-hand side.- Once again, add the OpenLayers library files to the form, by including the links shown in Listing 3-4 to the external libs property of the form:
|
1 2 |
http://gip.itc.utwente.nl/libraries/OpenLayers/v5/ol.css, http://gip.itc.utwente.nl/libraries/OpenLayers/v5/ol.js |
- Next, click on the edit... button of the javascript property of the form, and paste the content of Listing 3-5 in the JavaScript editor. When you are done click Save.
- Finally, save the form to store all the changes.
|
1 2 3 4 5 6 7 8 9 10 11 12 13 14 15 16 17 18 19 20 21 22 23 24 25 26 27 28 29 30 31 32 33 34 35 36 37 38 39 40 41 42 43 44 45 46 47 48 |
if ( $('#objectGeometry').getValue() == 'POLYGON()' ) { $('#mapContainer').find(".panel-body").html('No spatial objects where found for the map display...'); } else { var baseUrl = 'http://owsgip.itc.utwente.nl/cgi-bin/mapserv?map=/home/owsfiles/mapfiles/parcels.map'; var objectId = $('#cadastralNumber').getValue(); var mapCenter = eval('['+$('#objectCentroid').getValue()+']'); var osmLayer = new ol.layer.Tile({ title: 'OSM', opacity: 0.5, source: new ol.source.OSM() }); var suLayer = new ol.layer.Image({ title: 'Spatialunit', source: new ol.source.ImageWMS({ url: baseUrl, params: { 'LAYERS': 'spatialunit,su_neighs,su_obs', 'THEPARCEL': objectId}, serverType: 'mapserver' }) }); requestMap = new ol.Map({ layers: [osmLayer,suLayer], target: 'mapContainer', view: new ol.View({ extent: ol.proj.transformExtent([6.8658, 52.2109, 6.9182, 52.2270], 'EPSG:4326', 'EPSG:3857'), center: ol.proj.transform( mapCenter[0].coordinates, 'EPSG:4326', 'EPSG:3857' ), zoom: 15, minZoom: 16, maxZoom: 19 }) }); var bbox = $('#objectBbox').getValue(); bbox = eval(bbox.replace('BOX(','[').replace(')',']').replace(/ /g,',')); var wmsParams = '&VERSION=1.3.0&SERVICE=WMS&REQUEST=GetMap' + '&TRANSPARENT=true&FORMAT=image/png' + '&CRS=EPSG:28992&LAYERS=spatialunit,su_neighs,su_obs&STYLES=' + '&BBOX=' + bbox + '&WIDTH=' + (bbox[2]-bbox[0]) + '&HEIGHT=' + (bbox[3]-bbox[1]) + '&THEPARCEL=' + objectId; var wmsRequest = baseUrl + wmsParams; $('#wmsParams').setValue(wmsParams); $('#wmsRequest').setValue(wmsRequest); } |
This script is similar to the one we created before, so some of its elements should be familiar to you now. This time we start, in line 1 by checking if a cadastral object was identified. If not the script simply puts up a message in the mapContaner and stops. If on the contrary an object was found, then the script proceeds to create the necessary elements to display the object on a map. In line 4 we specify the URL to the WMS service endpoint that we will use to retrieve cadastral objects. In lines 6–7 we extract the 'object identifier' value from the form fields, and also define the object (parcel) centroid as the center of the map. In lines 9–13 we especify the base map, whcih uses the OpenStreetMap service. In lines 15–25 we create a layer to display the selected, cadastral object, its neighbours and its vertices. This data will be retrieved by OpenLayers using a WMS GetMap request. In lines 26–36 we create a map object, center it on the object of interest and add the two previously created layers. The map object is also associated with the mapContainer field of the form. If we preview the form now, we will not see any parcels because the script requires input from the user. In lines 38–47 we populate process variables with values that will allow the process to get access to the spatial data of the selected cadastral objects.
Conditions
We have now reached the part of the process where we need to specify the conditions that will be used to determine the path that each job instance has to follow after a request is reviewed.
- To add the required conditions to the gateway, right-click on the Gateway and select Properties.
- We have already created the variables needed for the conditions when we created the forms so now we just need to check for the right values. Proceed to insert the corresponding conditions according to Table 3-1.
Gateway conditions
| Next Task | Condition |
| Produce Certificate | @@requestType=='certificate' && @@requestApproved==1 && !(@@objectType=='ship') |
| Refusal Notification | @@requestApproved==0 || @@objectType=='ship' |
| Generate Dataset | @@requestType=='dataset' && @@requestApproved==1 && !(@@objectType=='ship') |
The first condition evaluates to true when the value of the requestType field is certificate and, the value of the requestApproved field is yes and, the value of the objectType field is parcel or public. You can certainly deduce when the other conditions evaluate to true.
Earlier on (see steps 9 & 10) we selected the method of Value Based Assignment for assigning jobs in various tasks. This type of assignment requires assignment values to be passed to those tasks in a variable. One of such tasks is the Produce Certificate task. We know from the process description that one employee deals with public parcels and another one with private parcels, so let’s set up the required conditions for this assignment.
- Let's start by creating a variable to store the identifier of the employee that will be assigned to the task.
- Click the Variables button and create a new variable called nextRegistrar
- To assign the new variable to the task, right-click on the
Produce Certificatetask and the select Assignment Rules. Change the value of the option Variable for Value Based Assignment to @@nextRegistrar and then save the changes.- To produce the value of the variable @@nextRegistrar we will use a trigger, which we will set to fire right before the
Produce Certificatetask is assigned. Create a new trigger and name itRegistrarChoice. Then enter the code in Listing 3-6 to the trigger and save.- To complete the assignment, right-click on the
Process Requesttask and select Steps. Now add theRegistrarChoicetrigger to the After Dynaform step of the task.
|
1 2 3 4 5 6 7 8 |
if (@@objectType == 'public') $nextUsername = 'mikefox'; // Assignment for public land jobs else $nextUsername = 'hollyross'; // Assignment for private land jobs // find the UID for the $nextUsername in ProcessMaker's MySQL database $result = executeQuery("SELECT USR_UID FROM USERS WHERE USR_USERNAME='$nextUsername'"); @@nextRegistrar = $result[1]['USR_UID']; |
The RegistrarChoice trigger assigns Michael Fox to jobs involving public land and Holly Ross to jobs involving private land. The variable @@nextRegistrar requires the UID of the user, rather than the name. The SQL code in line 7 queries the ProcessMaker database to retrieve the correct UID.
The process description also states that for each job instance, the same service officer has to perform the tasks that are the responsibility of the Client Service department. This means that, if for example, June James is assigned to review a request, then the email notification or service delivery tasks, within that job also have to be assigned to him. Similarly to the previous assignment we will use a variable and a trigger to realise this assignment.
- Create a new variable and call it performerOfficer.
- Right-click on the
Refusal Notificationtask and the select Assignment Rules. Change the value of the option Variable for Value Based Assignment to @@performerOfficer and save the changes.- Repeat the process for the
Deliver Servicetask- Create a new trigger and name it
ReviewPerformer. Then paste the code in Listing 3-7 on the trigger editor and save.- Finally, right-click on the
Process Requesttask and select Steps. Add theReviewPerformertrigger to the Before Assignment step of the task.
|
1 |
@@performerOfficer = @@USER_LOGGED; |
This trigger simply records the UID of the user that is logged in during the execution of the Process Request task in the @@performerOfficer variable. The variable is then used to realise the other assignments.