Creating a MAP file
You can now start to create your MAP file which will control how MapServer will turn your GIS data into an OGC compatible Web Map Server (WMS):
Open the (empty) text file called configWMS.map inside the directory thailand, using a text editor like NotePad++ (or WordPad or TextPad -- do NOT use MS Word or another wordprocessor!). Copy the code in the listing below into this file and save it. See the note in the "Preparation" section about entering and copying code! Make really sure you've saved the file as configWMS.map, NOT as configWMS.txt or configWMS.map.txt...!
Note the [NETPATH] parts that have to be substituted with the proper paths for your installation! See the setup instructions in the "Preparation" section.
|
1 2 3 4 5 6 7 8 9 10 11 12 13 14 15 16 17 18 19 20 21 22 23 24 25 26 27 28 29 30 31 32 33 34 35 36 37 38 39 40 41 42 43 44 45 46 47 48 49 50 |
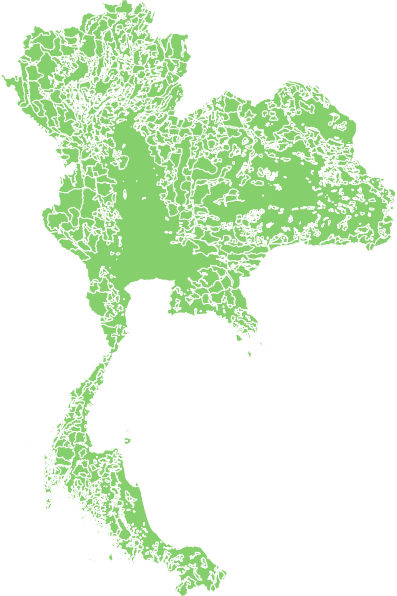
MAP NAME "Thailand" IMAGECOLOR 255 255 255 SIZE 600 800 IMAGETYPE PNG24 PROJECTION "init=epsg:4326" #latlon on WGS84 END #default projection EXTENT 97.3 5.6 105.7 20.5 # lon/lat extents of Thailand WEB METADATA "ows_enable_request" "*" "map" "[NETPATH]/configWMS.map" "ows_schemas_location" "http://schemas.opengeospatial.net" "ows_title" "ThailandWMS" "ows_onlineresource" "https://gisedu.itc.utwente.nl/cgi-bin/mapserv.exe?map=[NETPATH]/configWMS.map&" "ows_srs" "EPSG:4326" #latlon "wms_feature_info_mime_type" "text/plain" "wms_feature_info_mime_type" "text/html" "wms_server_version" "1.3.0" "wms_formatlist" "image/png,image/gif,image/jpeg" "wms_format" "image/png" END #web metadata VALIDATION "map" "*" END END #web LAYER NAME "forest" TYPE POLYGON STATUS ON CONNECTIONTYPE postgis CONNECTION "user=exercises password=exercises dbname=exercises host=gisedu.itc.utwente.nl port=5434 options='-c client_encoding=UTF8'" DATA "geom FROM thailand.forest USING UNIQUE id USING srid=4326" METADATA "ows_title" "forest" "ows_extent" "97.3 5.6 105.7 20.5" END #layer metadata PROJECTION "init=epsg:4326" END #layer projection CLASS NAME "forest" STYLE OUTLINECOLOR 255 255 255 COLOR 137 205 102 END #style END #class forest END #layer forest END #map |
The basic MAP file parameters
Map Files are the basic configuration mechanism for the MapServer. Anything associated with a particular application is defined here. The various parts each start with a keyword (e.g. MAP for the main map object), and end with the END statement. You have to make sure each part is properly ENDed and the parts are correctly nested! To help yourself to keep track of the parts, you are advised to use comments (preceded by a # sign) to help distinguish which END belongs to each keyword. Some of the most used keywords are explained below:
PROJECTION and ows_srs:
WMS servers have to advertise the projection in which they are able to serve data using EPSG projection codes. In the mapfile, you define a default projection like this (see lines 6 to 8):
  PROJECTION
    "init=epsg:4326"
  END
Later in the WEB objects of the map and its individual layers (see below), you can advertise which additional projections should be offered by the OWS interfaces, by specifying one or more EPSG codes in the ows_srs parameter. Note that when asked for a SRS that's not the default one, Mapserver will have to re--project the data before turning it into a map (which will have an impact on the performance).
By default layers inherit the SRS of their parent layer (the MAP default PROJECTION). For this reason it is not necessary (but still strongly recommended) to provide PROJECTION and ows_srs parameters for every layer.
The WEB object and included METADATA:
This defines how a web interface (such as OGC WMS) will operate. To properly define a WMS interface for Mapserver you must have the following in the METADATA (within in the WEB object):
ows_title: a title for the WMS serviceows_onlineresource: This specifies the URL that should be used to access your server. This is required for the GetCapabilities output and proper functioning of the WMS GetFeatureInfo. .ows_enable_request: This configures which of the OWS service interfaces will be exposed. "*" will allow them all.ows_srs: the list of SRSes the WMS will serve its maps in.
Per MAP, one or more LAYER objects:
The LAYER object describes layers used to make up a map. Layers order is not important, they will be drawn in the order they are requested by the client. The TYPE specifies shows how the data should be drawn, as POINT, LINE or POLYGON. THis normally should the same as the data type.
Per LAYER, a NAME and ows_title metadata:
Every individual layer needs its own unique name and title, both in the NAME parameter and teh ows_title parameter in the METADATA section. These layer names are used in GetMap and GetFeatureInfo requests to refer to layers that should be included in the map output and in the query. Layer names must start with a letter when setting up a WMS server, they should not start with a digit or have spaces in them.
Per LAYER, a DATA section:
The DATA section tells MapServer where to obtain the data for the layer. When using files, connecting a LAYER to a datasource is a simple matter of specifying the DATA parameter as a path to the data file. For connections to a PostGIS datasource, you have to specify the CONNECTION parameter first with a CONNECTIONTYPE postgis. The general form of the connection parameters for PostGIS is:
  CONNECTIONTYPE postgis
  CONNECTION "user=[username] password=[password] dbname=[database] host=[dbhost] port=[port] options='-c client_encoding=[encoding]'"
  DATA "[geometry column] FROM [table] USING unique [PK] USING srid=[epsgcode]"
In the CONNECTION parameter, you fill in the correct username, password, etcetera. The encoding should match the encoding of the PostGIS database, normally this would be UTF8.
In the DATA parameter, you specify a special type of SQL statement that will be sent to the PostGIS database. The PK should be the name of a column in your table that is unique for all rows, usually the Primary Key column. The srid parameter tells MapServer which Spatial Reference System (indicated by the EPSG code) the data is using.
For correct use of PostGIS layers in many of the GIS clients, MapServer needs a full specification of the LAYERs extent in the metadata of the layer. In order to do that, in the METADATA object in the LAYER, the line "ows_extent" "xmin ymin xmax ymax" is added. You can usually just copy the extent string from the general MAP extent.
Per LAYER, zero or more CLASS objects:
Embedded in the LAYER object are CLASS objects which defines the thematic classes for a given layer. How classes work and what you can do with them you will see in the next sections. You can make layers without classes, if you do not need styling (e.g., if you get styles from external styling such as SLD, or if you are defining a WFS or WCS).
Per CLASS, zero or more STYLE objects:
If you need classes with more than the simplest styling, you can embed STYLE objects to more freely define class styles, as explained later in this exercise.
Testing your Map File
To test if your MAP file is actually working, we will now request the WMS services from the MapServer application, through OGC GetCapabilities and GetMap requests. To display the mapserver settings using the GetCapabilities request:
Type the following URL in a web browser address bar (as one line, you can copy and paste from the box below):
https://gisedu.itc.utwente.nl/cgi-bin/mapserv.exe?map=[NETPATH]/configWMS.map&SERVICE=WMS&VERSION=1.3.0&REQUEST=GetCapabilities
Note again the [NETPATH] part that has to be substituted with the proper path for your account ! In this URL, you REQUEST the service operation you want to perform, in this case the OGC WMS standard request GetCapabilities. The VERSION parameter specifies the protocol version number. This request should return an XML document describing the capabilities of the WMS servcie you have set up. Study this GetCapabilities reply of MapServer.
In most web browsers, this XML will be automatically displayed inside your browser after the GetCapabilities request. In some setups, the browser might not recognise the XML file as readable output, and there might be a prompt to open or save the file. In that case, save the file and open it in a text editor or an XML editor.
Now, to display an actual map we will be using the GetMap request:
https://gisedu.itc.utwente.nl/cgi-bin/mapserv.exe?map=[NETPATH]/configWMS.map&SERVICE=WMS&VERSION=1.3.0&REQUEST=GetMap&CRS=EPSG:4326&BBOX=5,97,21,106&WIDTH=600&HEIGHT=800&FORMAT=image/png&LAYERS=forest&STYLES=
- With REQUEST you define the operation you want to perform
- In the CRS parameter you define which Spatial Reference System you want used
- With the BBOX you set a particular Bounding Box to be requested; in WMS version 1.3.0 the bounding box is requested as: minimum-latitude, minimum-longitude, maximum-latitude, maximum-longitude.
- The WIDTH and HEIGHT parameters specify the size in pixels of the map image to be produced.
- With the FORMAT parameter you state the desired format of the map image
- In LAYERS you list the names of layers you want to be displayed (with comma's between them)
- the STYLES parameter is used to associate styles with the layers. If the styles list is empty, Mapserver will use the default styles defined in the MAP file
Creating MAP requests by typing them in the browser URL address bar in this way is not very convenient. It is easier to construct these URLs by using the web-form we have provided in the TestWMS.html file in your thailand directory.